I have probably been designing our Christmas cards for at least 30 years now, and just finished the design, printing and envelope addressing for 2012 (possibly excepting a few last-minute additions to our list). I usually struggle with picking a text until it becomes clear that I have to make a decision and get on with it. After the devastation of Tropical Storm Sandy (the U S Weather Service apparently has decided it was no longer a hurricane when it hit us), my dominant feeling was simply gratitude – for having come through with no lasting damage or injury, for friends who helped us so much when we were without power, water, and heat, and for our family, who let us know we were cared about. After a lot of searching for a quote that had notes of both gratitude and Christmas, I again found myself up against deadlines, and decided to go with a traditional set of words for the Advent season – Hope, Joy, Peace and Love. These are usually the themes represented by the candles of the Advent wreath. Our adult class at church had been doing an Advent study centered around these themes, with the title “Christmas Gifts That Don’t Break,” so I wove “family” and “friends” into the background of the card design, and Anita and I decided on the inside text of “Wishing you gifts that last.”
Here’s the final design:
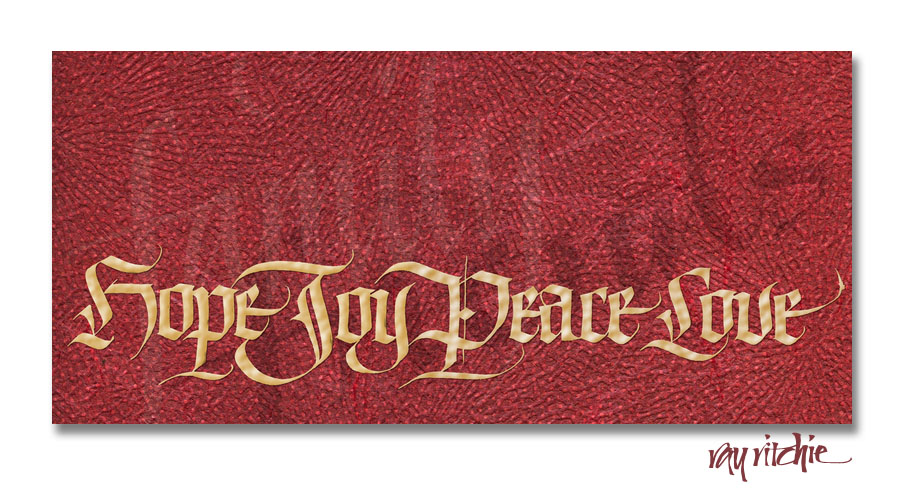 As I usually do, I began the card design by doing the main lettering in black and white. When I first started thinking of the Hope-Joy-Peace-Love theme, I tried a number of different styles and layouts of letters, but none of them were working for me. So I took a break and started reading a recent issue of Letter Arts Review, which had some very fine examples of Blackletter and Fraktur. Seeing those, I knew immediately I wanted to do the words in some form of Blackletter, and for some reason, I knew they would run across the entire bottom of the card. I really had no idea at that point as to what the rest of the design would look like.
Using Blackletter was for me an unusual choice, as I don’t do much of it. I had taken a multiple-day workshop on Blackletter styles with Julian Waters several years back, though, and he’s one of the best in the world at this hand, so I felt reasonably confident that I understood enough about it to make it work if I took the time to dust off some of my cobwebs. I went through probably a dozen or more renditions before I got one that I liked. As I started to close in on getting all the letterforms more or less the way I wanted them, I marked up each draft with corrections and laid a sheet of thin layout bond over it so that I could adjust the next draft to correct the deficiencies of the previous one.
I did the lettering with a large Automatic pen (that’s a brand name, not a description of some magical powers in the way the pen works) and black gouache, which is my favorite writing fluid. In this case, the original letters were more than an inch high. Working large makes it much easier for me to see where I’ve made mistakes, which is important when I’m using a style I’m less comfortable with, and when I finally get the letters right, reducing them in size for the final reproduction makes them appear sharper and smoother than they were actually written.
Here’s a sample of near-final headline letters at close to their original size:

I next quickly wrote a couple of versions of the words “friends” and “family” in my usual Italic style, thinking that I would work them into the piece somehow, but with no specific idea of where they’d be used.
I needed a background, and I didn’t have an idea for an illustration, so I decided I’d just try to invent a texture. Going through my stocks of papers, I came up with a couple of unusual handmade Japanese papers that seemed like they might work. One was a brilliant red with a sort of radiating pattern of ridges and wrinkles, and the second was a translucent white with circular patterns of opaque white dots. I stacked the second paper on top of a sheet of pale green, just to make the white dots stand out more, and scanned the paper designs and the lettering into Photoshop. Once I had them stacked as layers in Photoshop, I decided the red was too brilliant, and would be hard to reproduce in print, so I toned it down with a touch of brown and orange.
After playing around with “family” and “friends” in the layout, I finally decided to bleed both words slightly off the page and orient them diagonally, so that neither was entirely revealed. I also cut back the opacity of these words so that they became only faintly visible – mostly I was using them as additional texture, and I wanted people who noticed them to think a little about what they said, rather than being able to immediately read them.
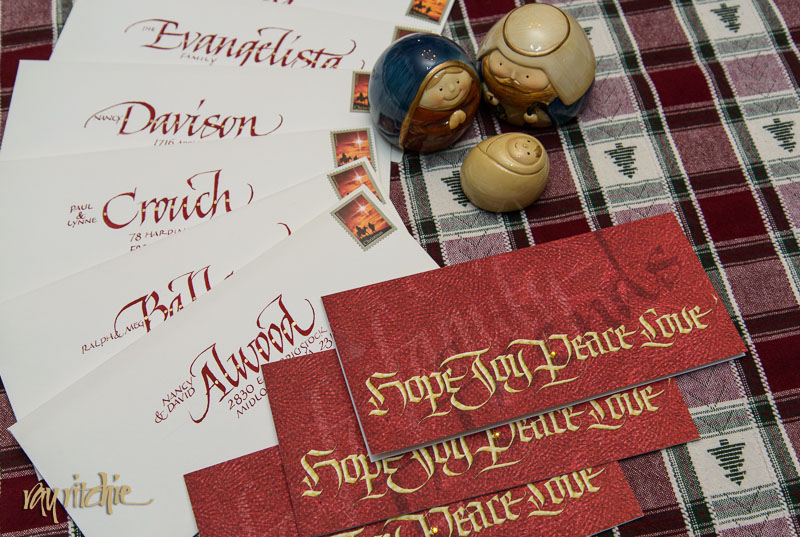
After I finished the design, Anita suggested that we add a small rhinestone on top of the diamond shape in the “P” of “Peace,” and I thought that touch of sparkle and dimension really added a lot.
The envelopes were addressed in large red letters matching the card color, and coincidentally, I was able to find a Christmas postage stamp that had some of the same red-orange tones in it. Here’s a shot of some of the completed envelopes along with the cards – if you look closely, you’ll see the rhinestones I mentioned above:
 Here’s wishing you all gifts that last this Christmas and throughout 2013!

