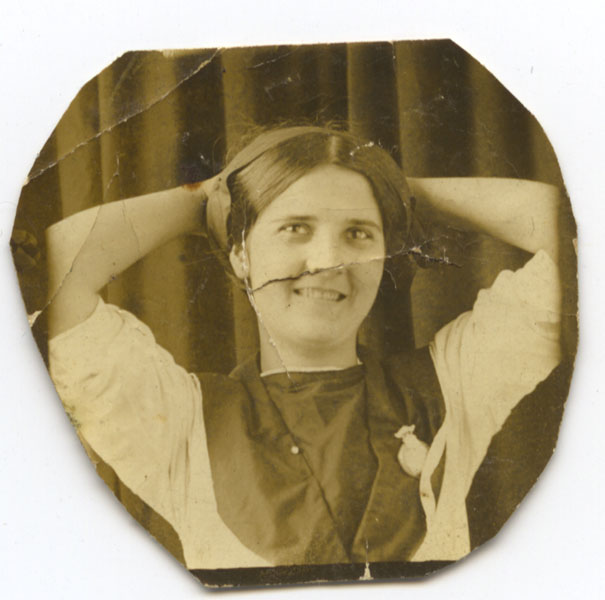
In my earlier post about my grandfather’s watch, I promised to make a future post showing the “before and after” of my photo restoration work on Grandma Bourne’s picture. My purpose here is not to give a detailed “how to,” but simply to give an illustration of what’s possible these days, as this photo was one of the most badly damaged pieces that I’ve ever worked on. Here’s what the photo looked like when it fell out of the watch:
As you can see, Grandma suffered a lot from 90 or so years in the back of Granddaddy’s watch. That photograph has just about all the impairments you’re likely to encounter in restoring old photos: foxing (the brown stains), scratches, bends, wrinkles, and rips. But as I discussed earlier, it was a unique photo, in that it showed my grandmother as young, smiling, and playful – a totally different view than any of the other family photographs I’d ever seen. Grandma worked for the Post Office in Washington, D. C. for a couple of years around the WWI timeframe, and I’m guessing this photograph was probably done during that period.
Photoshop CS5, which I am currently using, has several tools which help in this kind of work. The Healing Brush can be used to paint across blemishes – it looks at surrounding areas of the photo and replaces the painted-over area with a sort of average of the surrounding area. The Clone Stamp can be used to copy a texture from any arbitrary location; you can then “paint” with that copied area onto any other area; areas larger than the copied area will be painted with a repeating pattern. Both the Healing Brush and the Clone Stamp have been around for a long time, and have appeared in many past versions of Photoshop. New in CS5, though, is a tool called “Content Aware Fill.” WIth this tool, you can select an area of the image, hit “Delete,” and then choose from several options as to how to fill in the deleted area. One of these is “Content Aware,” which looks at the surrounding area and tries to make a good guess as to what the area being deleted should contain if it’s to look consistent with the rest of the image.
The Healing Brush is particularly effective on small blemishes surrounded by relatively smooth, undamaged areas – for example, it’s great at replacing a small scratch on the background curtain, or a pimple on an otherwise beautiful face. The Clone Stamp is good for working with areas that have some kind of texture, provided the area to be replaced isn’t too large (the pattern repetition of the Clone Stamp gets to be noticeable once the painted-over area becomes a lot larger than the original sampled area). Content Aware Fill can be almost magical, but particularly when working with portraits, it also has its hazards – you can easily end up giving a person a third eye or an extra nostril, or hair in the middle of their cheeks, if you’re not careful.
The key in doing this restoration work is just to work patiently, trying the various tools to see which works for each blemish, and using the History palette when necessary to back up to the previous state when something unexpected and unacceptable happens. Careful adjustment of the brush size (for the first two tools) and the selected area can make a huge difference in the result.
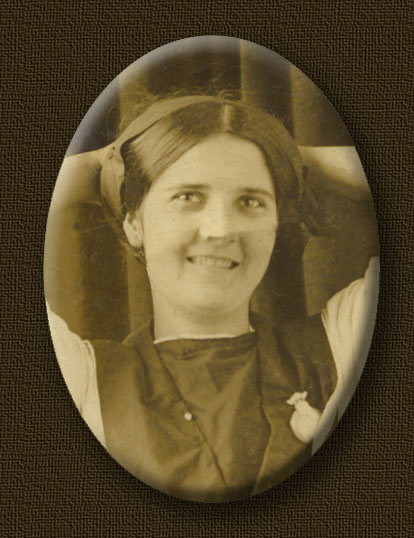
I used all three tools in working on this particular image. Because the edges of the photo were irregular, and partially cut off her arms anyway, I decided to crop the final restored image into an oval shape. After giving it a Bevel and Emboss effect to simulate a cameo, and a drop shadow to emphasize the 3-D effect, and a textured background, it came out like this:
You can still see things wrong that I could work on further if I chose to, such as changes to the tone of the skin of the face and neck, due to folds and wrinkles in the original that made the light from my scanner hit different areas from a different angle. But I usually stop on restoring old photos before everything has been smoothed away – I want the image to still look old. I’m happy with this result.
It’s still only a small image: the original was only a little bigger than an inch across, and this final version came out to something I could probably print at about twice the original size. My experience in scanning old prints tells me that it’s seldom worthwhile to try to print a copy bigger than 1-2 times the size of the original. But it’s a new addition to the family archives, and from my point of view, it was definitely worth the effort.


